# Blender
💡 TIP
Check out our dedicated tutorial on how to get started with Blender (opens new window)!
# Getting Started
For a quick overview, check out this short video on how to get started sending and receiving data from Blender!
# Installation
Before using this connector, you'll need to follow our standard setup instructions to install Speckle Manager and add a Speckle account.
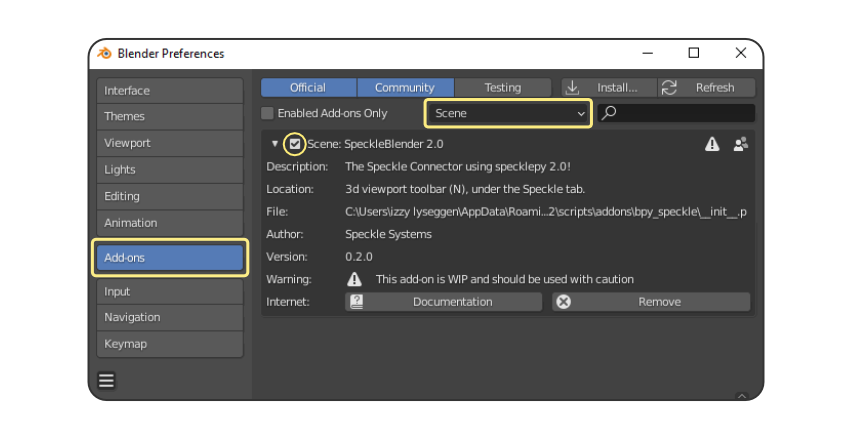
Once the connector has been installed, you will find it in the Add-ons tab of your Preferences menu, under the "Scene" category. Activate it by checking the tick box next to the Add-on name.
# Manual Installation
If setup from the manager didn’t work for you or you want to install the Blender connector on an unsupported Blender version (e.g. 3.3.):
- Go to
%appdata%/Blender Foundation/Blender/version-number (2.9, 3.1)/scripts/addons. - Copy
bpy_speckleandmodulesfolders from here. - Go back to
%appdata%/Blender Foundation/Blender. - Select the folder with the version name you want to install Speckle to.
- Go to
scripts/addons. Create them if they don’t exist. - Paste copied
bpy_speckleandmodulesfolder here.
After you’re done with these steps you should be able to see Speckle under Add-ons. Enable it from there. If you face any issues during the initial run, restarting Blender will fix it.
# User Interface
The Blender Connector lives in the 3D viewport toolbar (N) under the Speckle tab. It contains three main panels:
- User Panel for switching between different local accounts.
- Streams Panel for browsing your existing streams, creating new streams, or deleting old streams.
- Active Stream Panel for sending and receiving data to and from Speckle.
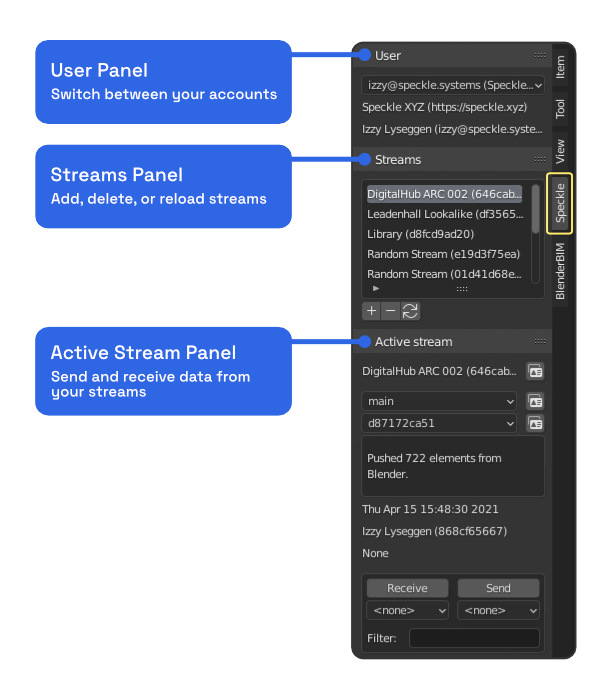
The Streams Panel shows a list of your most recent streams, which you can search through by name. You can add new streams with the "+" button, delete streams with the "-" button, and refresh the streams with the refresh button.
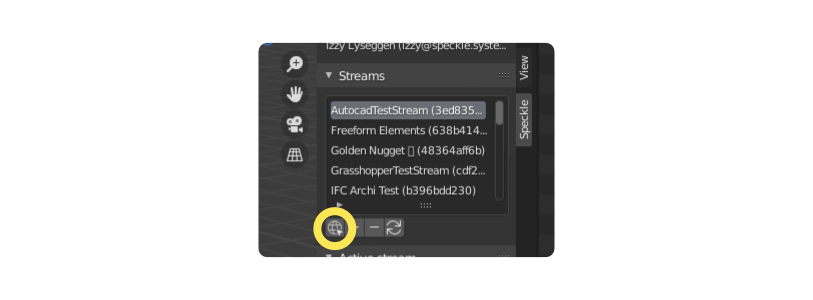
From version 2.1.9, you can also add existing streams by their URL. You can use the URL to a stream, a specific branch, or a specific commit. Simply paste it into the popup and the correct account, stream, branch, and commit will get selected for you.
The Active Stream Panel will show more details about the stream you've selected in the Streams Panel. From here, you can change the active branch and commit. You can also Send and Receive any items you have selected in Blender. Under the Send and Receive buttons, you can use the dropdown menus to select a script to run on all elements during the send / receive process.
At the very bottom of the panel (not pictured), you'll find a button that will open the stream in the Speckle Web App.
# Clean Meshes
One of the new features we added with the 2.9. release is Clean Meshes for Blender. With this feature, a single surface is obtained by combining triangular coplanar faces. This is especially useful for geometry that is coming from applications that do not support NGON meshes. With Clean Meshes, Material Assignment and UV Mapping will be much easier now.

Clean Mesh option can be accessed from the dialog that pops up after clicking the Receive button. By default, this will be unchecked🔳.

# Supported Elements
# Blender BIM
There is currently some limited support for BlenderBIM (opens new window), though this is intended as an export and does not work coming back. To take advantage of this, simply open an IFC using BlenderBIM then use the Speckle Connector to send to Speckle.
There are a few things to keep in mind when sending an IFC to Speckle using BlenderBIM:
- Structure: The hierarchical structure of collections and objects is preserved when sending to Speckle.
- The name of each object is attached in the
namefield. - Any
/in names will be replaced with::
- The name of each object is attached in the
- Materials: If the object has a material, this will be simplified into a Render Material (opens new window) and attached in the
renderMaterialfield. - Properties: Custom properties added within Blender are always added to a
propertiesfield on respective objects. For BlenderBIM objects, this includes theifc_definition_id.- Additional IFC properties that aren't stored in Blender are currently not extracted from the IFC and attached. This may be explored as an enhancement in the future.
- Type: Objects are all sent as meshes and collections are sent as
Baseobjects. None of the objects are currently being converted and sent as BIM objects.
# Developing Locally
If you'd like to help develop this connector further, you can pull from the github repo here (opens new window).
To run your local version of the connector, drag the bpy_speckle folder from the speckle-blender directory into your Blender addons folder replacing any previous version you may have in there. This will be at %APPDATA%/Blender Foundation/Blender/2.92/scripts/addons. If you haven't installed the connector before, you'll need to manually go into the addons/modules folder and install the dependencies there.