# Excel
Speckle currently supports the following versions of Excel:
- Excel on iPad
- Excel 2016 or later on Mac
- Excel 2013 or later on Windows
- Excel on the web
TIP
Check out our dedicated tutorial on how to get started with Excel (opens new window)!
# Getting Started
For a quick overview, check out this short video on how to get started sending and receiving in Excel!
# Installing
Our Excel connector is not distributed via the Speckle Manager.
Instead, you can get it from the Microsoft Office Store.
To install it:
- Open Excel (for Desktop or Web)
- Click on Insert > Office Add-Ins
- Search for
speckleand click Add
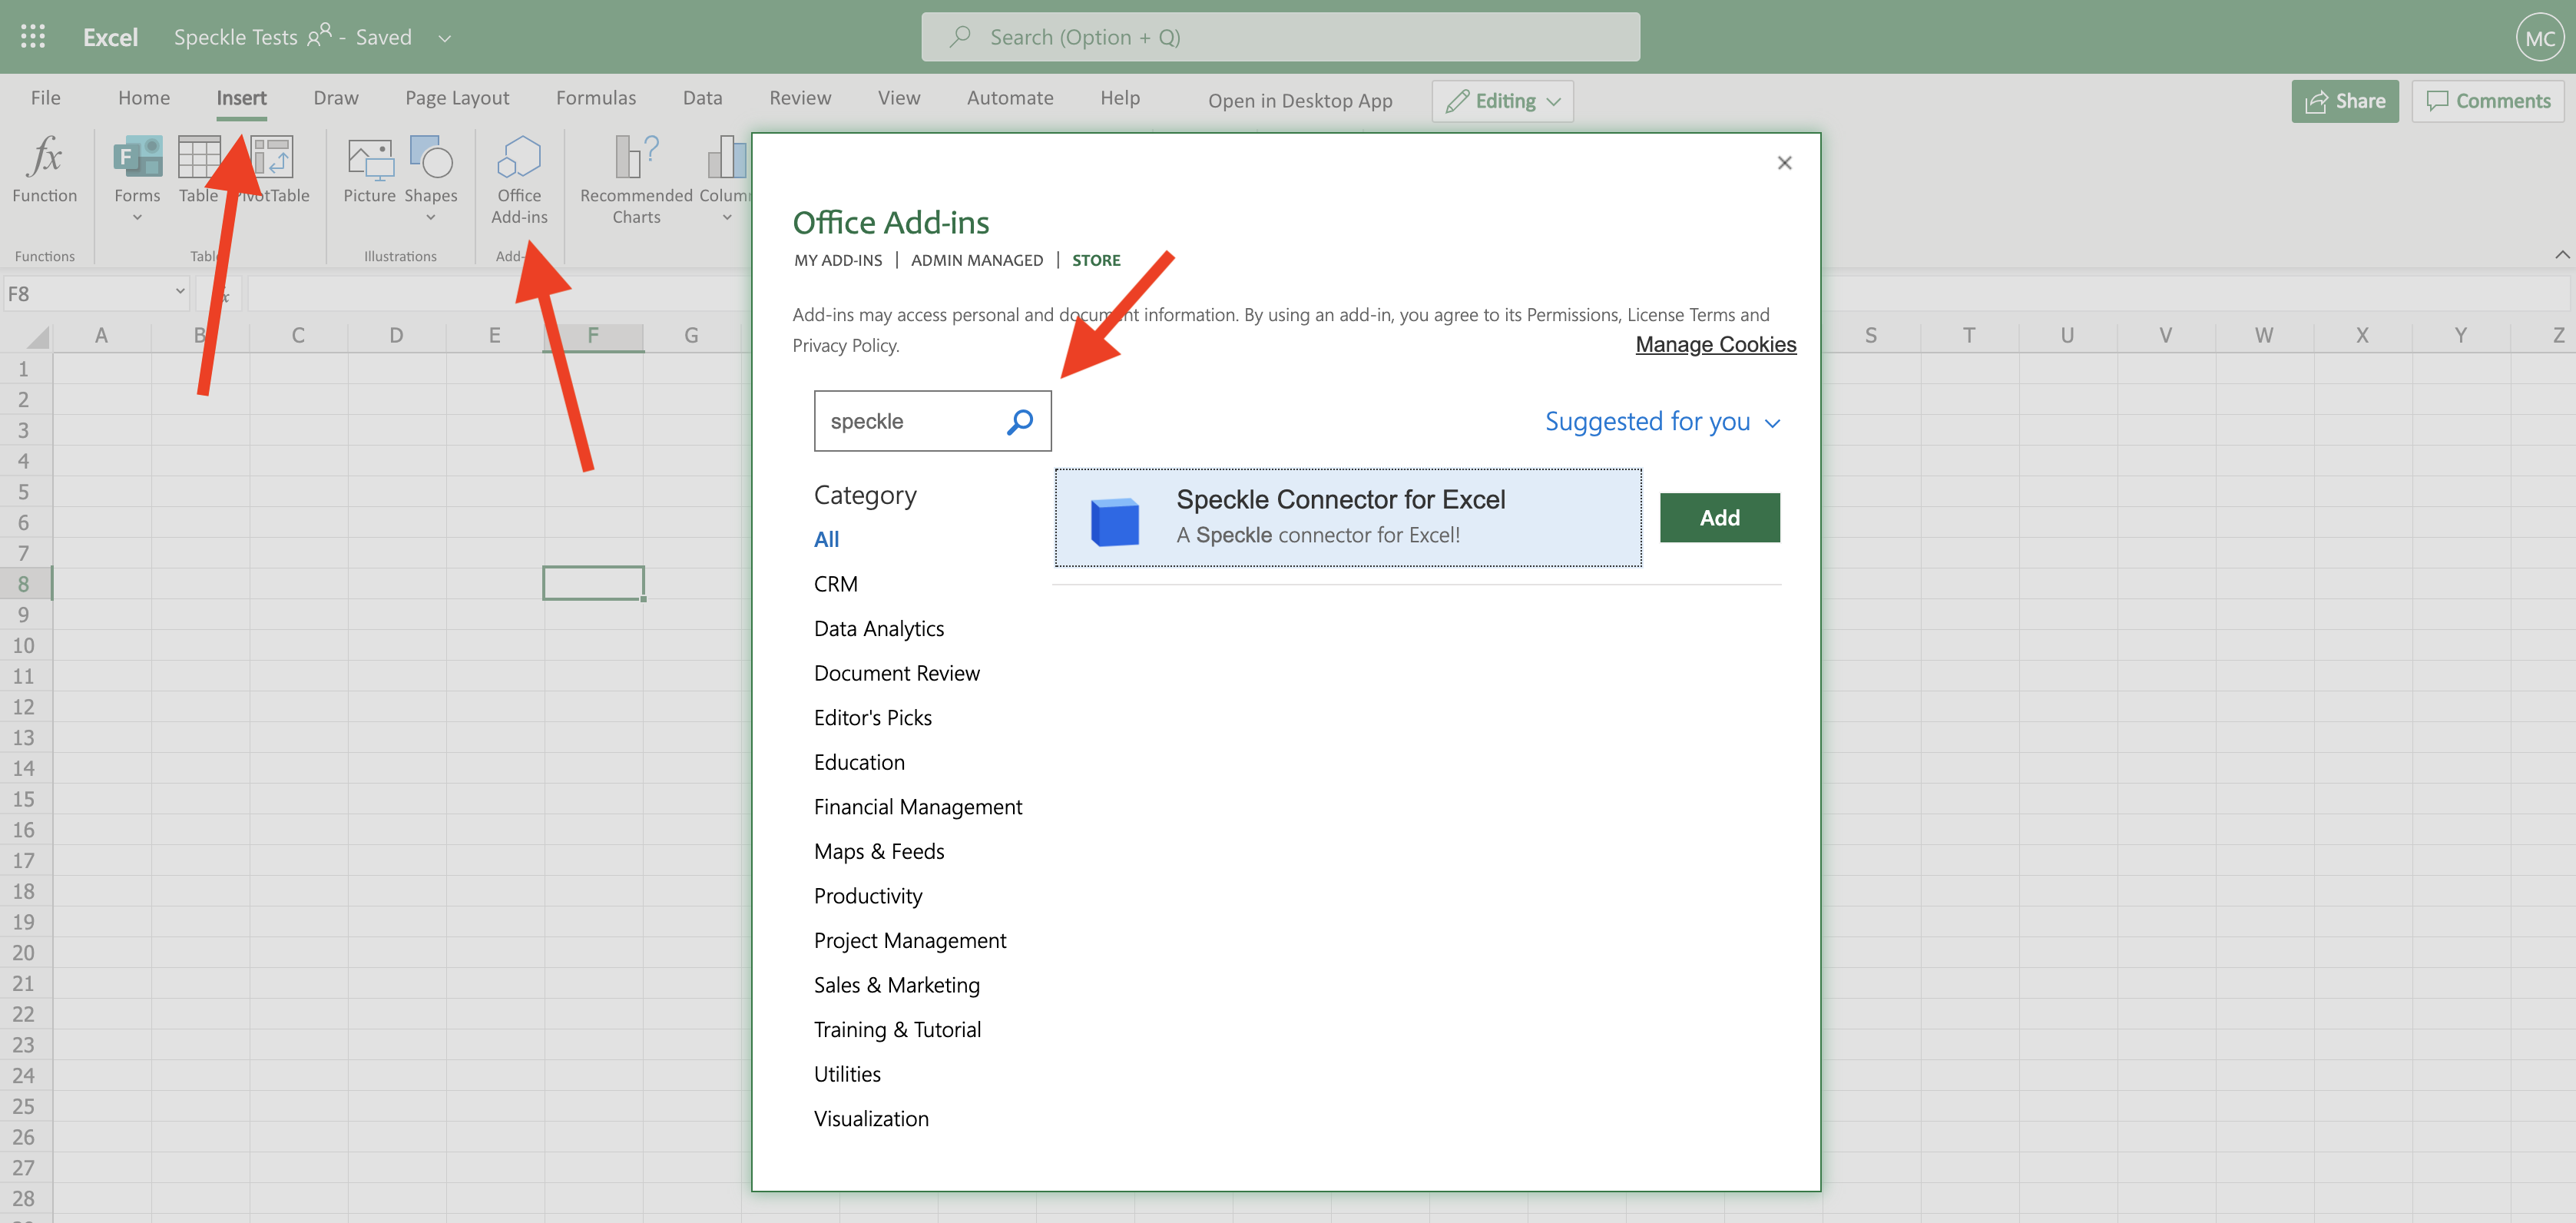
Alternatively, just visit https://appsource.microsoft.com/en-us/product/office/WA200002934 (opens new window).
After installing the connector, it should appear in Excel under the Home ribbon like so:

# Logging In
You'll need to log in to use this connector as it is unable to access your accounts from Speckle Manager. To do so, simply type your server url click on the log in button and insert your credentials.
IMPORTANT 🙌
Currently, only accounts on servers managed by us are supported, this is because of limitations on the Microsoft Office Store. To use the Excel connector with a server deployed by you, you'll have to publish it yourself.
# Adding Streams
Just click the top left menu > Add stream > click on a stream to add to the document. The stream will be saved in the document and available whenever you return to it.
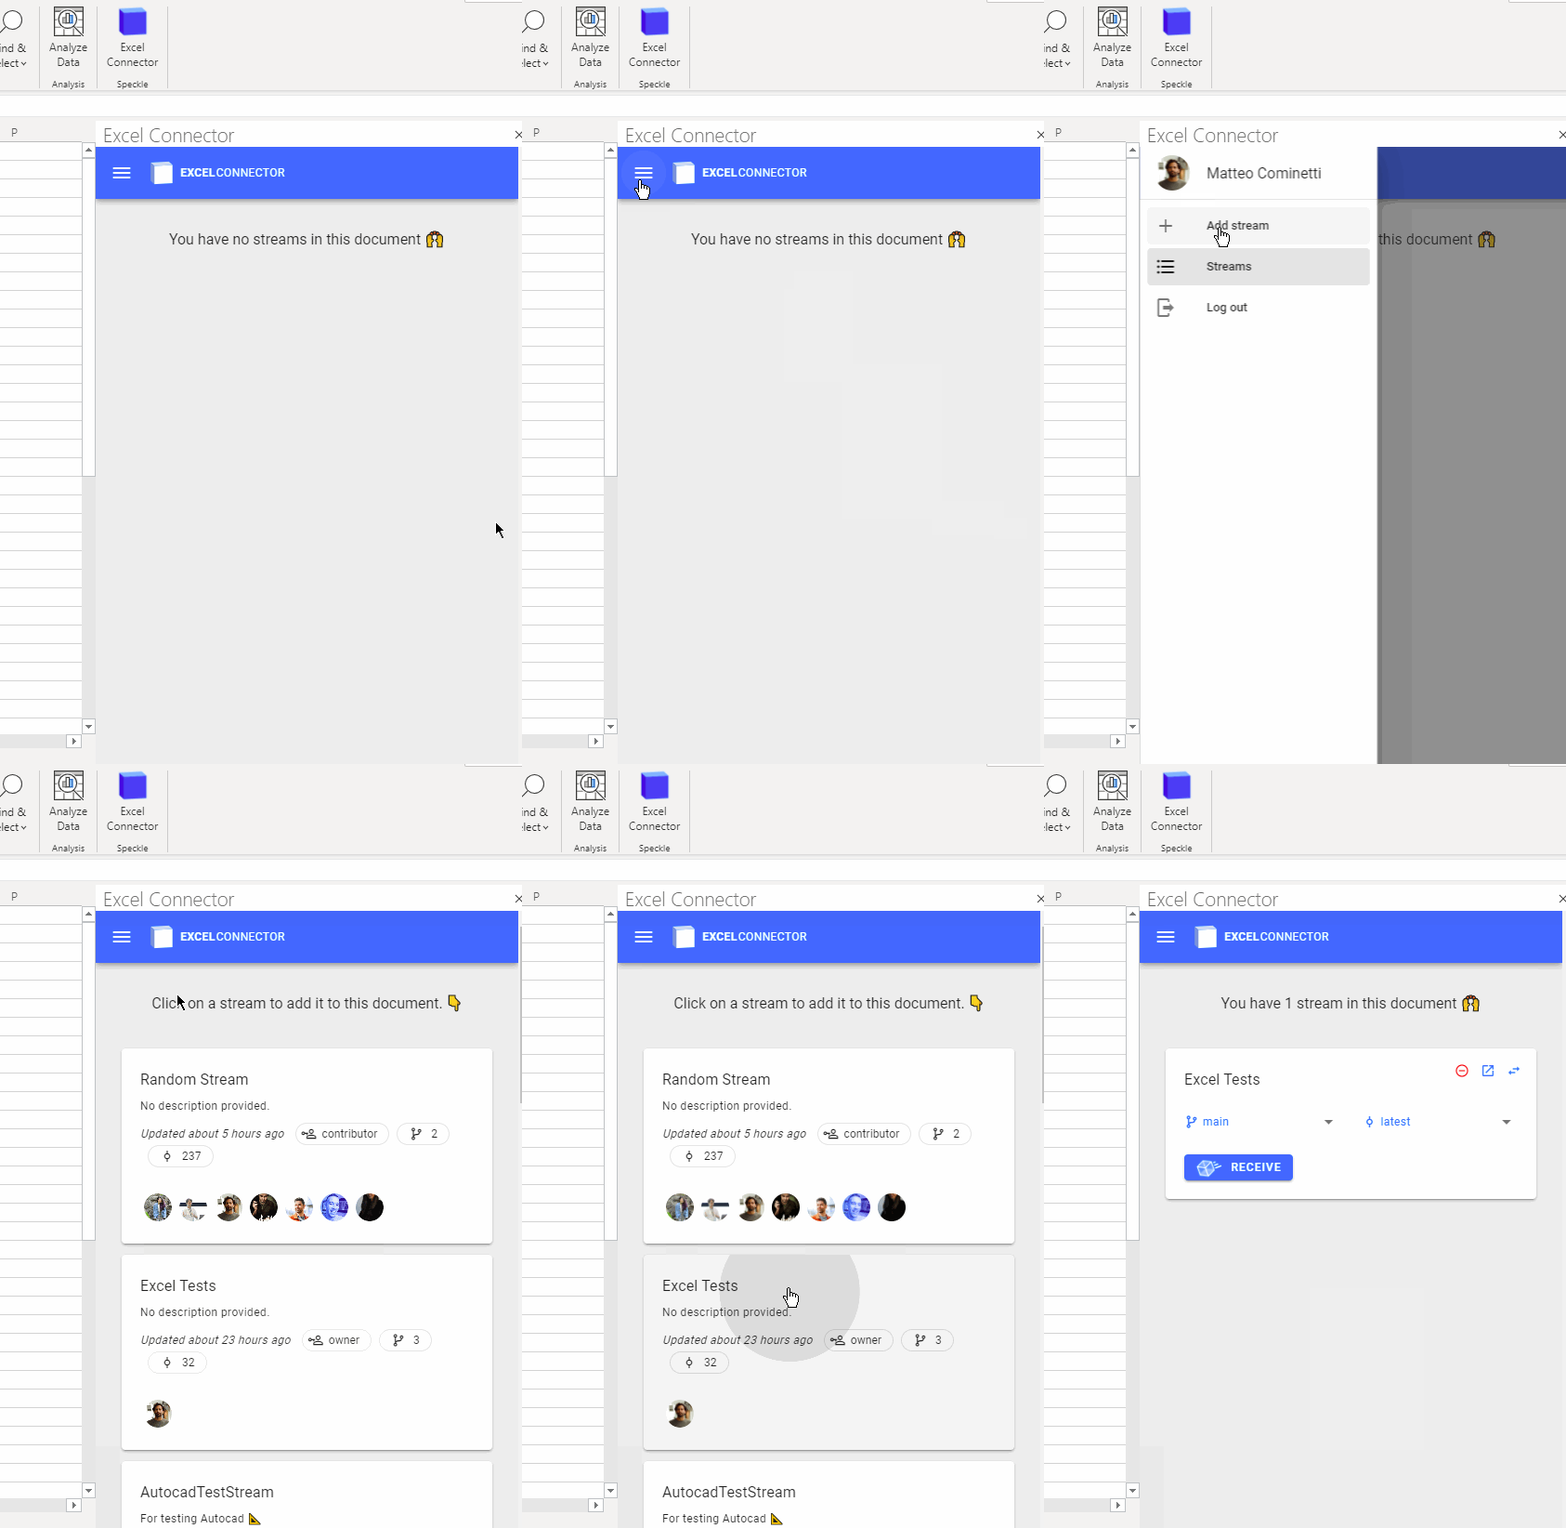
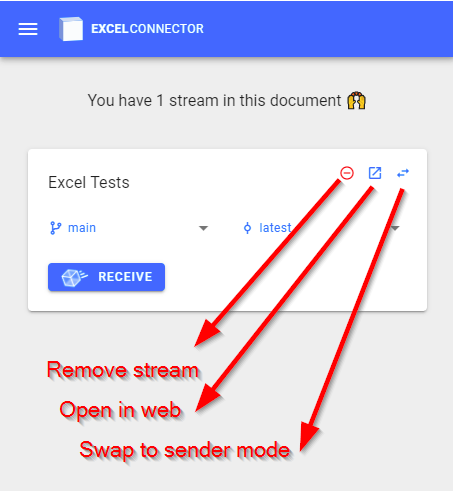
By default, streams are added as receivers but you can easily switch them to sender mode.
# Receiving Data
Receiving data in excel is quite different than in other connectors, and this is because we need to "flatten" it so to represent it in a table format. In general, a stream will either contain:
- Simple values like numbers, text etc
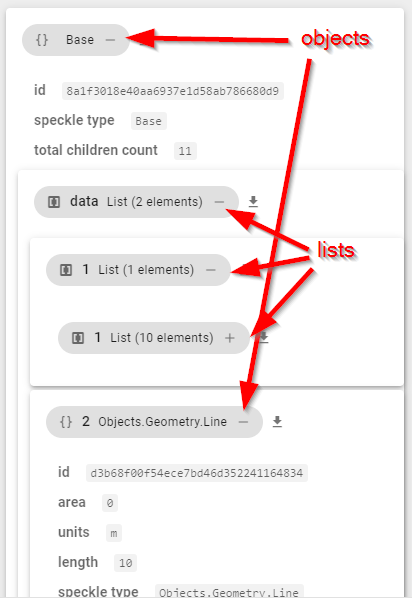
- Complex data structures (objects) like a Revit Wall or a Grasshopper Line. Objects are identified by a
{}symbol.
The Excel connector works best when receiving lists of either simple values or objects of the same type. Lists are identified by a [] symbol.
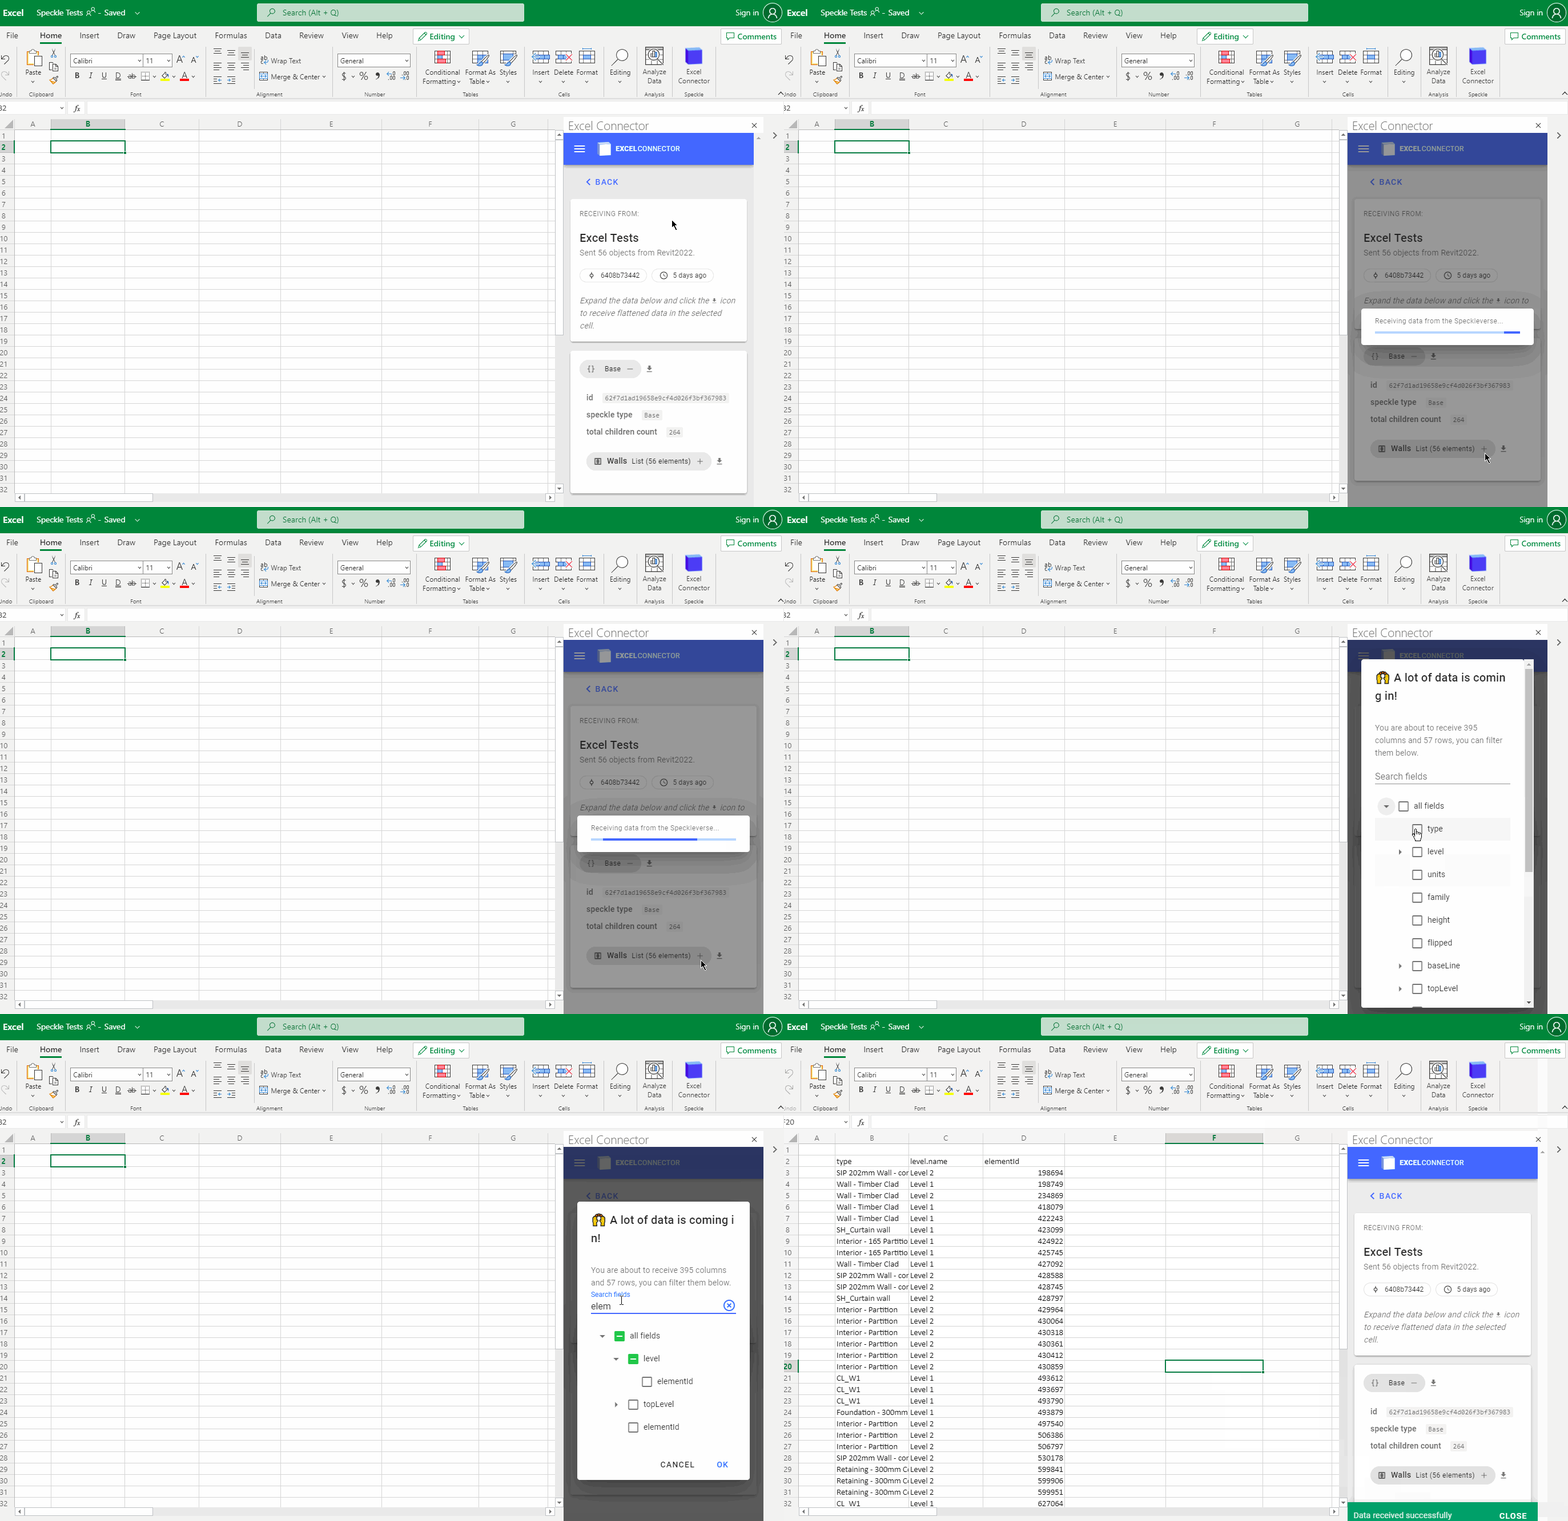
Since a commit can contain a variety of data types, after clicking the receive button, you'll have the possibility to expand and select which data inside it to actually pull and write to your Excel file. You don't have to receive an entire commit each time!
# Simple Values
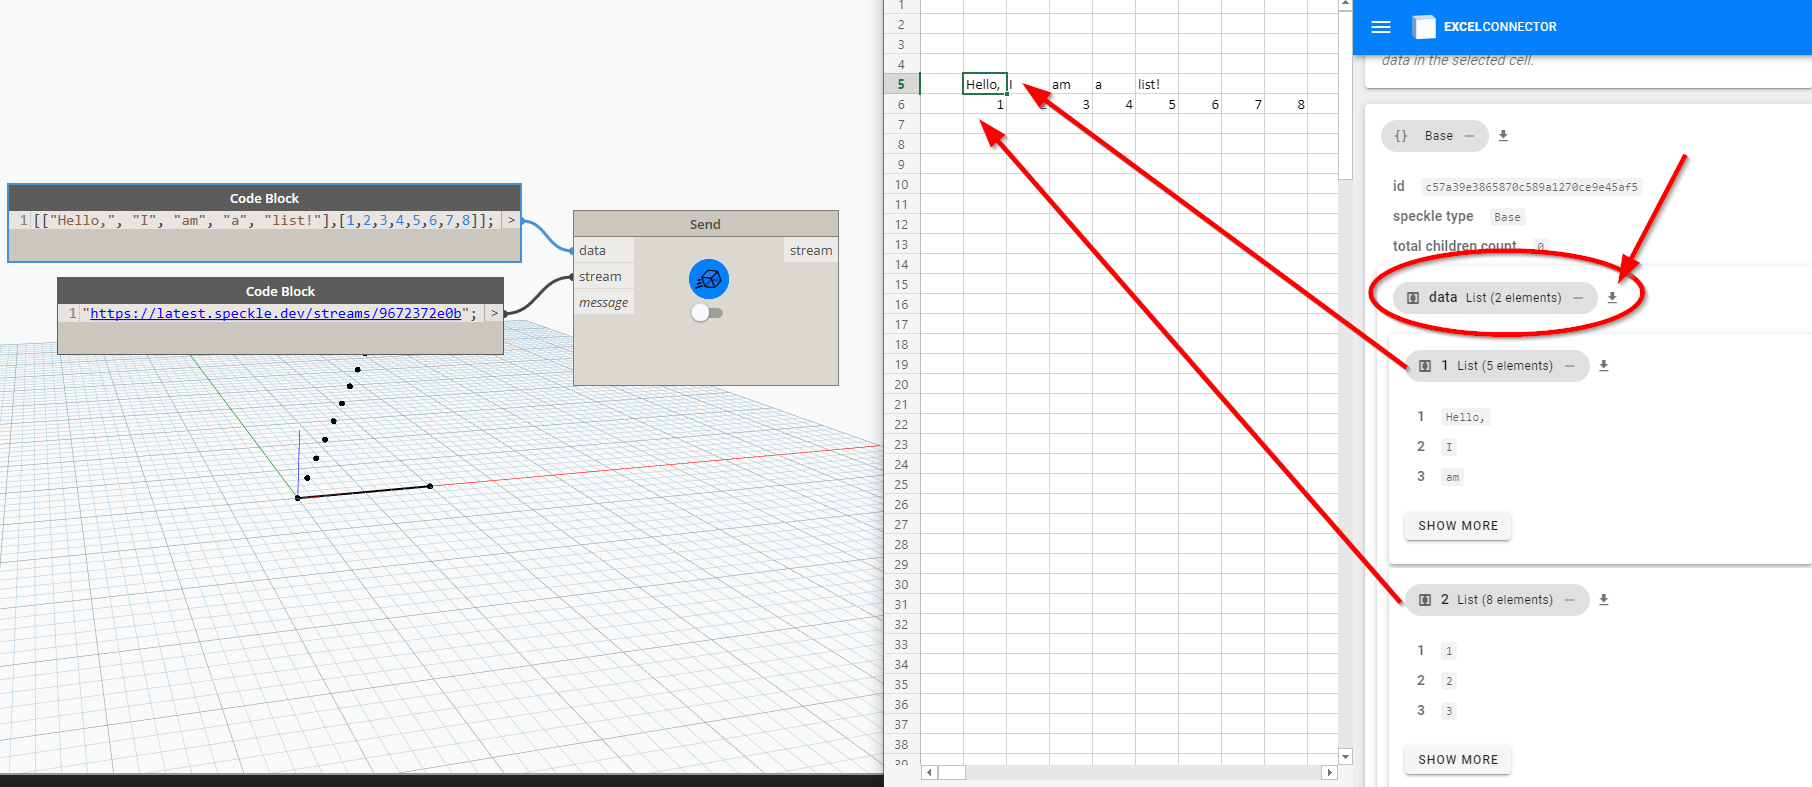
When receiving lists (or lists of lists AKA tables) of numbers or text, the data is received without transformations and the values are outputted by default in rows. Therefore, a single list will write data to a single row, a list of lists to multiple rows. If the incoming data has any further levels of nesting, it will be "string-ified".
# Objects
When receiving lists of objects they are flattened. This means that each object will become a new row and all its property values (and sub-property values) will become columns, their names will be the headers. Individual objects can be received too, and only one row will be created.
TIP 🙌
We recommend receiving lists of objects that have the same underlying data structure, i.e. only receiving objects of the same type.
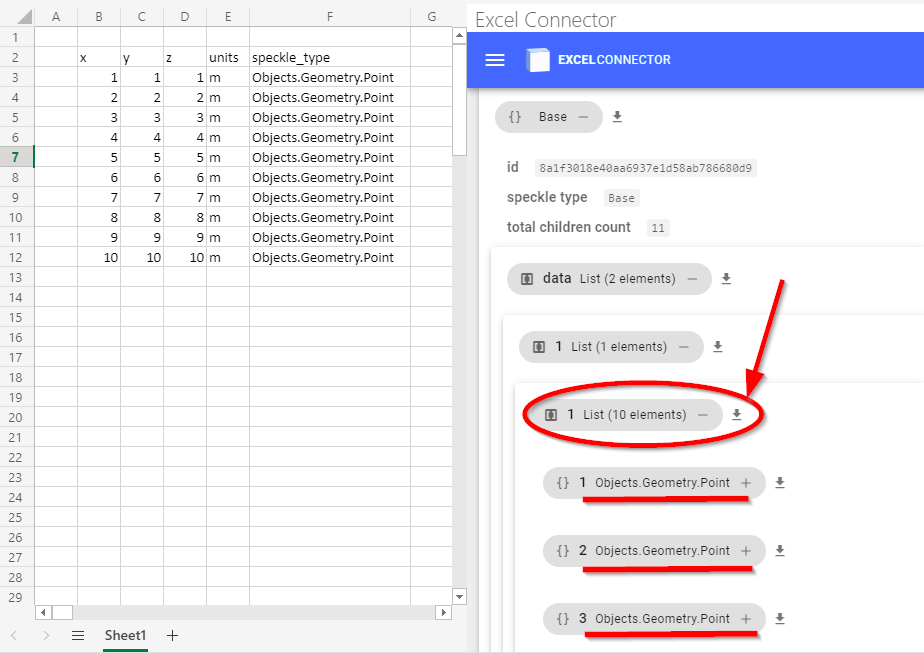
Nested objects are flattened as well and their properties delimited by a period .. See the example below where 10 lines have been streamed from Dynamo to Excel:

# Complex Objects
When receiving complex objects (with more than 25 properties or sub-objects), you'll be presented with an additional dialog. This will let you filter which columns are to be received.
# Sending Data
Similarly to receiving, data can be sent a list of simple values or of objects.
# Simple values
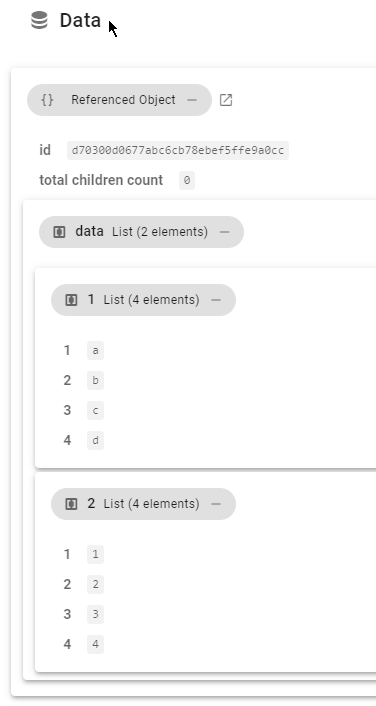
Just select the range of data you want to send and click "Set range"
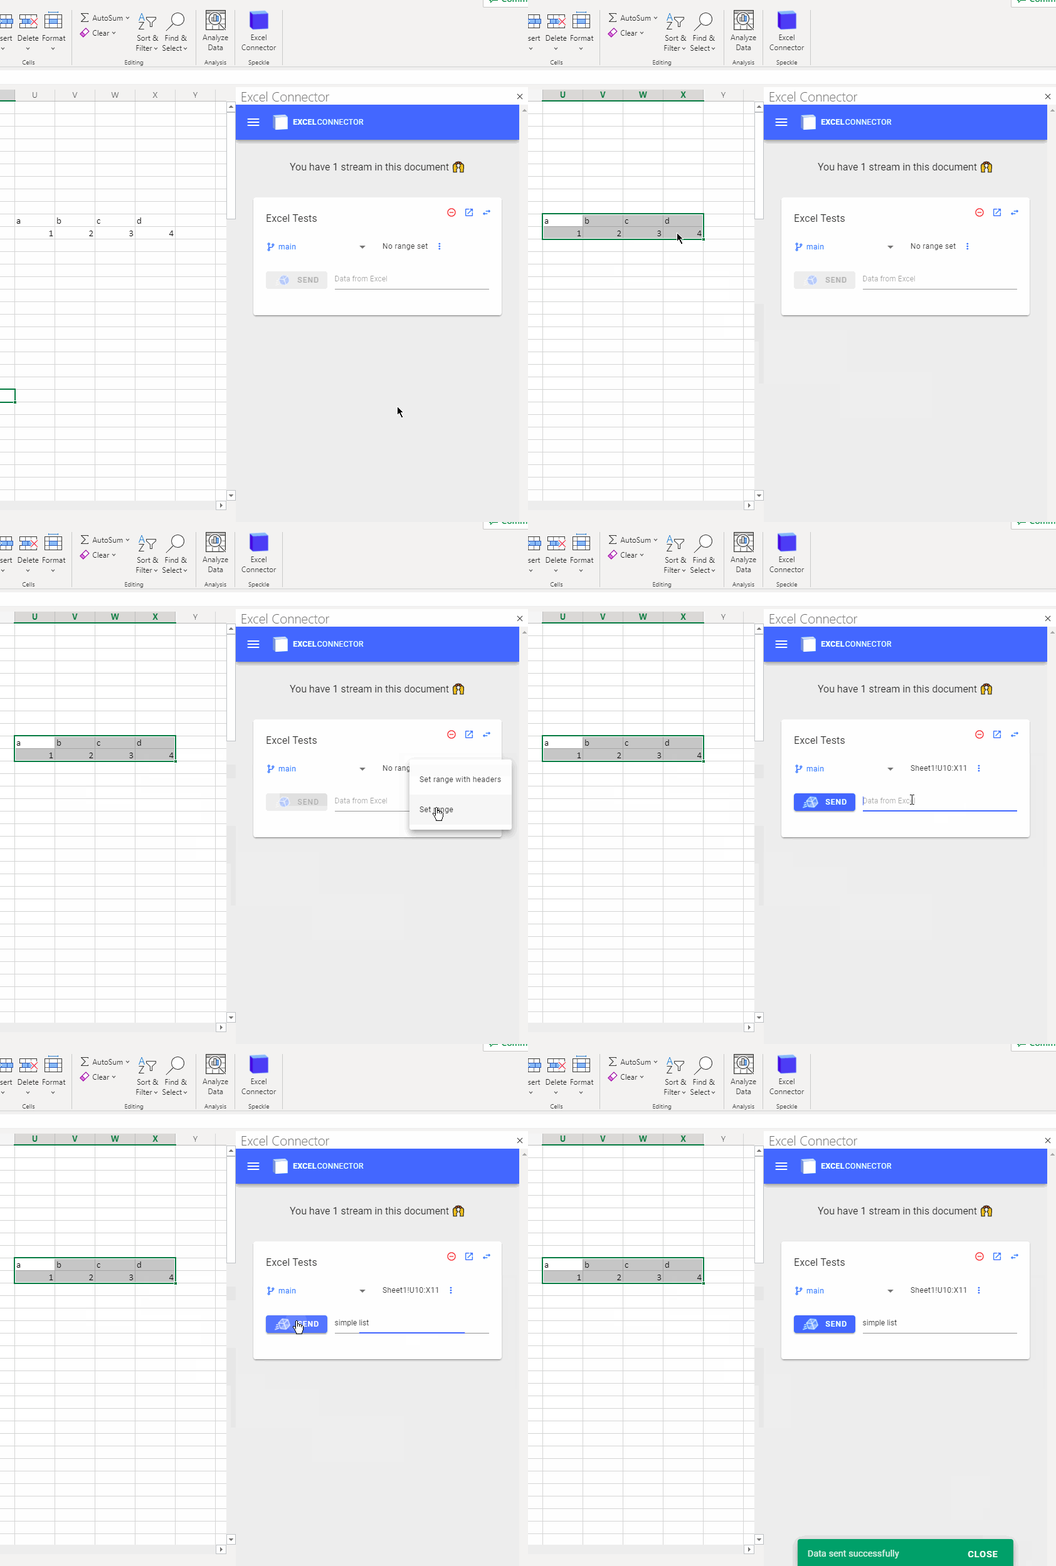
This is how it'll look in Speckle.
# Objects
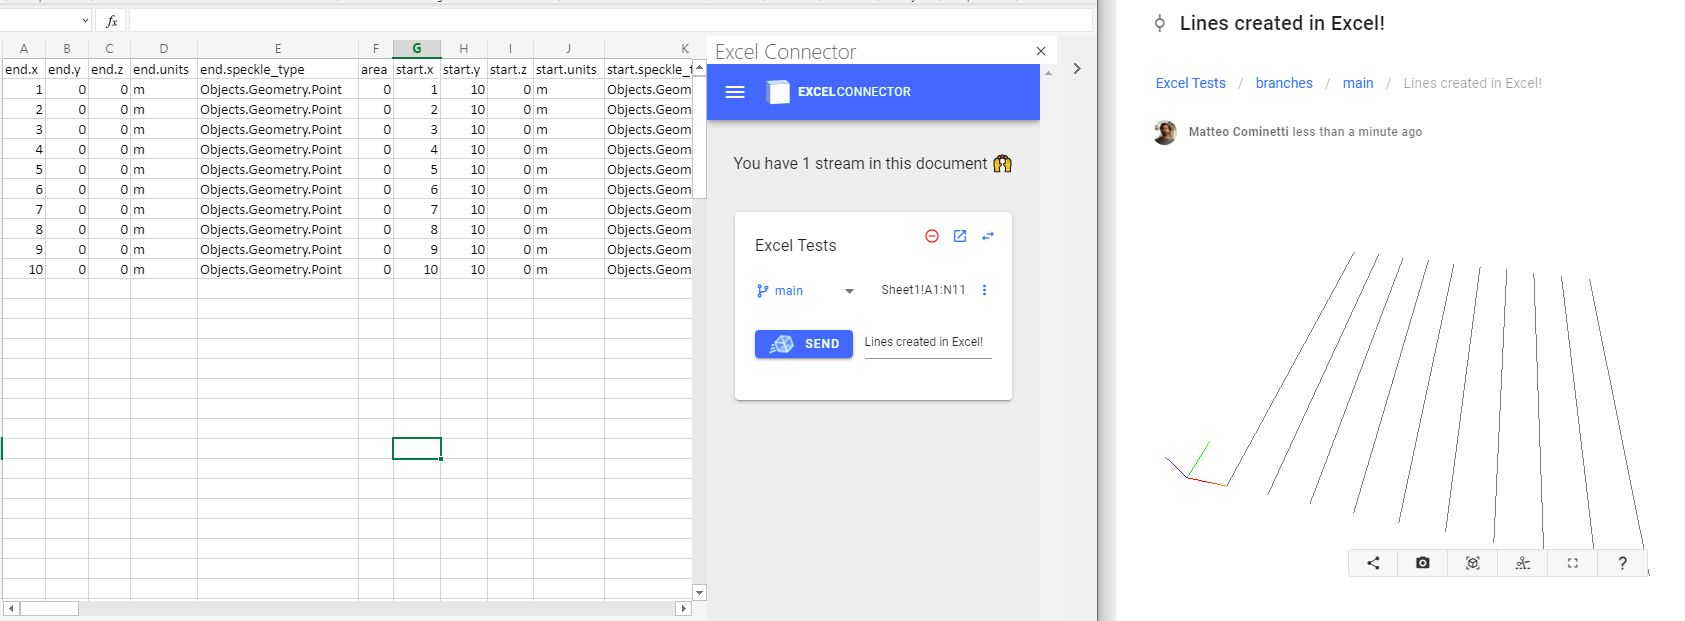
To send objects, just replicate the structure of objects that you have previously received, then select "Set range with headers".
For instance, you could create 10 new lines with the data below:
# Advanced workflows
IMPORTANT
🚧 This section is under construction, we will add more documentation and examples on this soon! 🚧
More advanced workflows are possible, similarly to how our Grasshopper Schema Builder works, you can create BIM elements directly from Excel and update Revit elements too.
# Updating Revit Parameters
To update Revit parameters from Excel, just copy paste the sample table below and update it with your element ids and values. We are working to make this flow simpler and more intuitive, it might change in the future
| elementId | parameters.speckle_type | parameters.ALL_MODEL_INSTANCE_COMMENTS.value | parameters.ALL_MODEL_INSTANCE_COMMENTS.units | parameters.ALL_MODEL_INSTANCE_COMMENTS.speckle_type | speckle_type |
|---|---|---|---|---|---|
| 198694 | Base | My sample comment 1 | m | Objects.BuiltElements.Revit.Parameter | Objects.BuiltElements.Revit.ParameterUpdater |
| 198749 | Base | My sample comment 2 | m | Objects.BuiltElements.Revit.Parameter | Objects.BuiltElements.Revit.ParameterUpdater |
| 234869 | Base | My sample comment 3 | m | Objects.BuiltElements.Revit.Parameter | Objects.BuiltElements.Revit.ParameterUpdater |
| 418079 | Base | My sample comment 4 | m | Objects.BuiltElements.Revit.Parameter | Objects.BuiltElements.Revit.ParameterUpdater |
Here's a breakdown of what each column means:
- elementId the Revit
ElementIdorUniqueId - parameters.speckle_type always set to
Base - parameters.BUILT_IN_PARAM_NAME.value the value to set on the parameter, where
BUILT_IN_PARAM_NAMEshould be replaced with the BuiltInParameter name from Revit - parameters.BUILT_IN_PARAM_NAME.units the unit of the parameter, only used in case of linear units, see supported values here (opens new window)
- parameters.BUILT_IN_PARAM_NAME.speckle_type always set to
Objects.BuiltElements.Revit.Parameter - speckle_type always set to
Objects.BuiltElements.Revit.ParameterUpdater
You can also update multiple parameters for each Revit element, to do so, just add more parameters.BUILT_IN_PARAM_NAME columns.
# Support
For any feedback and support requests please visit our community forum (opens new window).
